I'm off work now for twelve beautiful days in a row!
This morning, at five o'clock, when Boyfriend got up to face his workday, we chatted a bit, then got on to the topic of my plans for the day.
I said I was hoping to get some quilting done.
Boyfriend thought a moment (I could see the wheels turning), then said "Ok, and then how about putting away your stuff in the basement family room, dusting the downstairs, and straightening up your sewing room?"
He was attempting to get back at me for interfering with his plans for his days off, you see! Very cute!
Except that my list is always longer. I didn't say it then, but I'm saying it now:
Is that before or after I clean the bathroom, vacuum, empty and re-load the dishwasher, mow the front and back lawns after picking up the dog poop, wash, dry, fold and put away the laundry, wash the kitchen floor and some of the cupboard doors?
And after lunch...?
There are three of us living together now. A couple of weeks ago I put my foot down about cooking dinner. See, if I make a dinner, it's wholesome and nutritious, and takes into account the fact that these two diabetic men shouldn't have too many carbs. I plan what I'm going to make, I shop for what is needed or make a list for one of the guys to pick the stuff up, and I start cooking early enough that we're not eating at eight at night.
If they "cook," it's Harvey's or Miss Italia, or Benny's.
So we are trying out a new system, suggested by my Beautiful Daughter, called GoodFood.
There are 7 days in a week. We order in one of those days. That leaves six days, divided between three people: i.e. - we each have to make dinner two days a week.
So, since we get three GoodFood dinners a week, we each only have to come up with ONE meal per week out of our own brains.
We've finished one week, and it was more or less a success. I had to go out Tuesday night, so the men decided to go to Harvey's.
I really am a ball and chain in their way! They really don't care if they live or die, nor how young!
Ahem. I digress.
Today's jobs are well begun. The first load is through the washer and the upstairs has been vacuumed. Hubby says the lawn doesn't need mowing, so that lets him off the hook. It does need mowing, so lucky me, I get to do that as well, despite the fact that there are three of us living here, and I mow the lawn every week, and do all the vacuuming.
Now, there are lots of stressors in life, and most of them we can't change. Apparently, I can't get Hubby to understand the need for mowing and vacuuming. These have been bones of contention between us for over two decades, and I guess I just have to learn not to react in anger.
BUT I WANT TO SMACK HIM!
No, no, Debbie, "don't be negative" one of my BEST FRIENDS said to me last weekend!
Everyone blames me, because I get angry! I squawk. It's "blame the victim" time all over again! "Oh - you married a man who doesn't cook, doesn't clean, and doesn't do yard work? Your fault! You left him once, you knew what you were getting into when you went back, why are you yowling now?"
To be fair, it was accept his invitation or go live in a car.
At any rate, I simply can't go on like this. I've got to learn how to vacuum, scrub, mow and whatever...without getting angry.
Wish me luck.
Thursday, June 21, 2018


Saturday, May 26, 2018
Success at Warp, machine quilting and free-motion
Keeping track of warp and weft worked wonders for my quilt!
All the rows were absolutely painless to stitch together, since they were being sewn along the WEFT - the ever-so-slightly stretchy part of the fabric weave. I've never had rows go together so easily!
And there the joy began to fade...
Sandwiching this lap quilt, I damaged nerves in a couple of fingers, so I'm obviously doing something wrong there. But I dutifully did verticle, horizontal, and both diagonals, despite an e x t r e m e boredom with the process and a flaming desire to get AT it on the machine!
Came the day, I made myself attach the walking foot too. I don't know how you feel about the walking foot, but I absolutely hate using it. Nevertheless, reason prevailed over passion and I hooked it up. I had even used chalk lines to mark my diagonals! I've NEVER behaved myself so well!
That's when things went rapidly downhill.
The first thing that happened was that the walking foot snagged on every single basting line. Even when I lifted the foot to its maximum. So, so much for all that nerve-damaging basting: who knows what will hold and what will slip now?
The actual stitching was fine. Exactly on the points. But basically, I do three or four lines and I'm looking around for something else to do. It might be more fun if I could use an ordinary foot, but then layers would probably slip.
The simple fact is, sewing on a home machine simply isn't as much fun as I thought it was!
Over the years I've gotten used to hand-quilting, which, while slow, lets you fix small errors as you come up on them, is emotionally soothing, and your basting stays put.
This process was not soothing.
On to practising the free-motion part that was going to be in the blank squares of my Irish Chain quilt.
I dutifully made a small sandwich to practise on and pounced the chalk outline of the Scotch Thistle pattern.
Now, I don't do free-motion the way most people are instructed to... Leah Day on the web had a great tutorial that tells you to a) leave your feed dogs where they are, b) reduce the pressure on the presser foot, and c) turn the stitch length to 0.
It works wonderfully. A little bit of practise and I had gone all the way around my thistle. Perfectly. The tension was balanced (you have to make it around an 8 for free motion) and everything worked perfectly.
Except...
Except I don't have a stitch regulator on my home machine, so some of the stitches are small, and others are larger. Don't get me wrong - they're all "in the ballpark!" They're not radically different from each other...
I held my piece up to examine it at close range, and heaved a heavy sigh. Years of hand-quilting have spoiled me. I like my stitches to all be the same size!
I suddenly had an image of the meeting room where I used to attend our quilt guild, filled with familiar faces of people who love quilting. I remember talking about my machine quilting and how much fun it was, and especially trying to convince the ladies to try some free-motion quilting.
I clearly remember how their faces all became polite, blank masks, and I remember wondering what was wrong with these people that they couldn't get excited about this process!
Ahem. Now I know. They like all their stitches to be the same length. They don't like their laborious basting to get ripped out as they're sewing. In hand-quilting, you have absolute control. With a home machine that doesn't have a stitch regulator, it's simply not perfect.
Good enough - to be sure! Nothing the uninitiated would see, only quilters would see the problems!
But not perfect.
Sigh.
All the rows were absolutely painless to stitch together, since they were being sewn along the WEFT - the ever-so-slightly stretchy part of the fabric weave. I've never had rows go together so easily!
And there the joy began to fade...
Sandwiching this lap quilt, I damaged nerves in a couple of fingers, so I'm obviously doing something wrong there. But I dutifully did verticle, horizontal, and both diagonals, despite an e x t r e m e boredom with the process and a flaming desire to get AT it on the machine!
Came the day, I made myself attach the walking foot too. I don't know how you feel about the walking foot, but I absolutely hate using it. Nevertheless, reason prevailed over passion and I hooked it up. I had even used chalk lines to mark my diagonals! I've NEVER behaved myself so well!
That's when things went rapidly downhill.
The first thing that happened was that the walking foot snagged on every single basting line. Even when I lifted the foot to its maximum. So, so much for all that nerve-damaging basting: who knows what will hold and what will slip now?
The actual stitching was fine. Exactly on the points. But basically, I do three or four lines and I'm looking around for something else to do. It might be more fun if I could use an ordinary foot, but then layers would probably slip.
The simple fact is, sewing on a home machine simply isn't as much fun as I thought it was!
Over the years I've gotten used to hand-quilting, which, while slow, lets you fix small errors as you come up on them, is emotionally soothing, and your basting stays put.
This process was not soothing.
On to practising the free-motion part that was going to be in the blank squares of my Irish Chain quilt.
I dutifully made a small sandwich to practise on and pounced the chalk outline of the Scotch Thistle pattern.
Now, I don't do free-motion the way most people are instructed to... Leah Day on the web had a great tutorial that tells you to a) leave your feed dogs where they are, b) reduce the pressure on the presser foot, and c) turn the stitch length to 0.
It works wonderfully. A little bit of practise and I had gone all the way around my thistle. Perfectly. The tension was balanced (you have to make it around an 8 for free motion) and everything worked perfectly.
Except...
Except I don't have a stitch regulator on my home machine, so some of the stitches are small, and others are larger. Don't get me wrong - they're all "in the ballpark!" They're not radically different from each other...
I held my piece up to examine it at close range, and heaved a heavy sigh. Years of hand-quilting have spoiled me. I like my stitches to all be the same size!
I suddenly had an image of the meeting room where I used to attend our quilt guild, filled with familiar faces of people who love quilting. I remember talking about my machine quilting and how much fun it was, and especially trying to convince the ladies to try some free-motion quilting.
I clearly remember how their faces all became polite, blank masks, and I remember wondering what was wrong with these people that they couldn't get excited about this process!
Ahem. Now I know. They like all their stitches to be the same length. They don't like their laborious basting to get ripped out as they're sewing. In hand-quilting, you have absolute control. With a home machine that doesn't have a stitch regulator, it's simply not perfect.
Good enough - to be sure! Nothing the uninitiated would see, only quilters would see the problems!
But not perfect.
Sigh.
Monday, April 16, 2018
Warp, Weft, Weeping and Wizardry
I'm starting a new quilt, a very simple pattern: a single Irish Chain.
That means alternating blocks of 9-patches and squares. In this case, my 9-patches finish at 6.5 inches, and I have 6.5-inch squares in white. The 9-patches are in mixed tones and patterns of yellows. This is for my other cousin, whose favourite color is yellow, and he's older than me, and I had to use something I could do quickly!
But this time I tried, really tried, to use my noggin. For a change.
I started off cutting my white 6.5-inch strips the easy way, how you get it from the store, folded cleanly with the selvages meeting...It's a white-on-white, and it's not floral, it's geometric. Rectangles and faint lines.
My first (easy) cut was less than satisfactory, however, as the lines in the fabric didn't line up with the cut edges I had so carefully measured.
That was when I made myself stop and consider the problem of warp and weft.
The warp fibers are the ones firmly attached to the ends of the loom, at the top and bottom, as it were. In cotton, there is virtually no stretch at all along the warp, because these threads are pulled tight, tight, tight.
The weft is the horizontal threads, pulled through with the shuttle. As the shuttle reaches one end, it is turned back to go the other way. This leaves a finished edge, originally called a "self-edge," now shortened to selvage.
There is a little give in the weft - in a line from selvage to selvage. A teensy, ever-so-small bit of give.
Cotton fabric, even the best quilting cotton, stretches a bit along the weft.
Now, as quilters, we are all concerned with controlling stretch. And when I started off quilting many moons ago, I made every effing mistake it was possible to make concerning stretching my fabric!
I ironed the bejeezuz out of it with steam - which served to set in plenty of distortion. I pinned it up the yin-yang, which created lumps and bumps. I didn't cut accurately, which meant none of my squares or triangles ever fit, and I sewed a generous 1/4 inch seam instead of a scant 1/4 seam, which meant I had no room at all to square things off.
None of my blocks lined up with each other, and I was in tears most of the time. Because I didn't understand how fabric stretches, and how to use that knowledge to my advantage.
So on this day, I stopped cutting along the selvage (weft) of my fabric and took the time to open it up, turn it around, cut it into manageable-sized pieces and cut my 6.5 inch strips along the line of the warp.
And after that, I turned my strips over and drew a chalk line the length of that warp strip, so that when I cut it into squares, I'd be able to tell immediately which direction would stretch, and which direction wouldn't.
Now, when I go to sew my alternating blocks into rows, I will put my 9-patch up against the warp side of the square. Because I can tug at the 9-patch to make it fit the square, and the square isn't going to stretch vertically.
When I go to attach the rows, I will be using the faint stretch of the weft to compel the blocks to line up with each other at the seams.
In this way I am using the natural stretch to my advantage, for a change.
Pictures if it works!
That means alternating blocks of 9-patches and squares. In this case, my 9-patches finish at 6.5 inches, and I have 6.5-inch squares in white. The 9-patches are in mixed tones and patterns of yellows. This is for my other cousin, whose favourite color is yellow, and he's older than me, and I had to use something I could do quickly!
But this time I tried, really tried, to use my noggin. For a change.
I started off cutting my white 6.5-inch strips the easy way, how you get it from the store, folded cleanly with the selvages meeting...It's a white-on-white, and it's not floral, it's geometric. Rectangles and faint lines.
My first (easy) cut was less than satisfactory, however, as the lines in the fabric didn't line up with the cut edges I had so carefully measured.
That was when I made myself stop and consider the problem of warp and weft.
The warp fibers are the ones firmly attached to the ends of the loom, at the top and bottom, as it were. In cotton, there is virtually no stretch at all along the warp, because these threads are pulled tight, tight, tight.
The weft is the horizontal threads, pulled through with the shuttle. As the shuttle reaches one end, it is turned back to go the other way. This leaves a finished edge, originally called a "self-edge," now shortened to selvage.
There is a little give in the weft - in a line from selvage to selvage. A teensy, ever-so-small bit of give.
Cotton fabric, even the best quilting cotton, stretches a bit along the weft.
Now, as quilters, we are all concerned with controlling stretch. And when I started off quilting many moons ago, I made every effing mistake it was possible to make concerning stretching my fabric!
I ironed the bejeezuz out of it with steam - which served to set in plenty of distortion. I pinned it up the yin-yang, which created lumps and bumps. I didn't cut accurately, which meant none of my squares or triangles ever fit, and I sewed a generous 1/4 inch seam instead of a scant 1/4 seam, which meant I had no room at all to square things off.
None of my blocks lined up with each other, and I was in tears most of the time. Because I didn't understand how fabric stretches, and how to use that knowledge to my advantage.
So on this day, I stopped cutting along the selvage (weft) of my fabric and took the time to open it up, turn it around, cut it into manageable-sized pieces and cut my 6.5 inch strips along the line of the warp.
And after that, I turned my strips over and drew a chalk line the length of that warp strip, so that when I cut it into squares, I'd be able to tell immediately which direction would stretch, and which direction wouldn't.
Now, when I go to sew my alternating blocks into rows, I will put my 9-patch up against the warp side of the square. Because I can tug at the 9-patch to make it fit the square, and the square isn't going to stretch vertically.
When I go to attach the rows, I will be using the faint stretch of the weft to compel the blocks to line up with each other at the seams.
In this way I am using the natural stretch to my advantage, for a change.
Pictures if it works!
Friday, September 16, 2016
UFOs
G R O A N . . .
Un Finished Objects
I am currently (supposed to be) making a quilt for my cousin. It is sandwiched, and I have begun quilting, but it got put on hold for...
A baby quilt, because my cousin's son became a daddy! And at the same time as that happened, I received a birthday present of the accuquilt tools for appliqué, so I thought I'd just whip out a quick little baby quilt for my new first-cousin-twice-removed...

Now, the green leaves are actually part of the print the leopard is on. But the white leaves and the purple leaves are from other fabric, and I had to cut them out individually. There are twenty of those around the leopard. Twenty appliquéd leaves around each animal on the quilt, six animals in all.
It's taking an eternity.
To top that off, there was another little baby born at very nearly the same time, to Boyfriend's family, and I gaily thought, "oh, I'll just make two at the same time!"
Hah! Boyfriend's little nephew will be getting a substantially simpler quilt!
But in the middle of trying to make the two baby quilts, it became Boyfriend's birthday, and I had promised to make him a chest protector for archery.
So the baby quilts stopped while the chest protector got made. And the birthday party was had.
Now the birthday is over, the baby quilting has resumed, and I have high hopes my cousin will get her quilt by christmas.
I dearly hope.
Un Finished Objects
I am currently (supposed to be) making a quilt for my cousin. It is sandwiched, and I have begun quilting, but it got put on hold for...
A baby quilt, because my cousin's son became a daddy! And at the same time as that happened, I received a birthday present of the accuquilt tools for appliqué, so I thought I'd just whip out a quick little baby quilt for my new first-cousin-twice-removed...

Now, the green leaves are actually part of the print the leopard is on. But the white leaves and the purple leaves are from other fabric, and I had to cut them out individually. There are twenty of those around the leopard. Twenty appliquéd leaves around each animal on the quilt, six animals in all.
It's taking an eternity.
To top that off, there was another little baby born at very nearly the same time, to Boyfriend's family, and I gaily thought, "oh, I'll just make two at the same time!"
Hah! Boyfriend's little nephew will be getting a substantially simpler quilt!
But in the middle of trying to make the two baby quilts, it became Boyfriend's birthday, and I had promised to make him a chest protector for archery.
So the baby quilts stopped while the chest protector got made. And the birthday party was had.
Now the birthday is over, the baby quilting has resumed, and I have high hopes my cousin will get her quilt by christmas.
I dearly hope.
Monday, May 30, 2016
Courageous L'il Ole Me
The 2016 Quilt show in Montreal has finished. It was spectacular! I was exhibiting one quilt, "In Spite of Dread and Doubt and Tattle-tale." I am never under any illusions about my quilts winning anything - I'm far too careless.
It is true - I get impatient when I'm quilting. I change my plans part way through, I can't be bothered to switch thread colors...my name is Debbie and I am an impatient quilter.
I always ask for my quilts to be judged though. There are three judges who view each quilt separately and give marks for certain criteria and written comments.
My marks have stayed pretty consistent for a decade. I'm not going to divulge them, (apparently I have some pride) but suffice it to say that, had I had marks like that in high school, I would have had a lot more friends!
I am most pleased with the written comments though. The judges clearly took their time studying my piece. It can't have been easy for them, because there is such a variation between the great parts of my quilt, and the less-than-great parts.
But one thing all three judges said was how courageous I was to put text in my quilt. (Most of the actual "quilting" - the bit where you sew all three layers together - is done in text.)
And several people who I know from the two guilds I've attended met up with me and asked me how I did so much text.
So I thought I'd describe my "courageous" technique!

So I will use this quote as my example: "When all is dark within the house, who knows the monster from the mouse?"
I did the text first, before going back over the quilt and filling in the spaces left unquilted.
So first I had to mark the writing on the quilt. The easiest way to practise this (because practise actually helps!) is to use a small quilt sandwich with white fabric. Mark the words with a graphite marker or just a pencil if you're going to be sewing in dark thread. That color combo is the easiest way to mark.
Of course, I didn't have that option. I had to use the blue water-soluble marker for the orange and pink backgrounds of the quote. Where the color switches to dark purple, I had to use a white marker.
Those white markers are tricky to work with though, because you have to go over them multiple times, and it takes up to ten seconds for the white marks to start to show. So you have to be patient when using them.
Once you have your text written out to your satisfaction, you have to use a hoop. You will be using your preferred method of free-motion quilting. Some people drop the feed dogs, I don't. I use the method proposed by Leah Day, where you set your stitch length to zero. She explains it better than I can!
Doing the text as quilting, you really have to put it in a hoop. Some smaller hoops you can put in place simply by lifting your presser foot manually, larger ones are a bit trickier. You have to put the outer ring of the hoop under the presser foot first. I turn it so it's standing up - that way it's not even 1/4" thick - and slide that under the foot. Then you do the same for the inner ring. Finally you shove your quilt in and get it all settled in the hoop, with you writing hopefully contained within it. If the writing extends, well you sew up to where you can't sew any more, and stop with needle down, so you don't have to make a lump backing up over your stitching.
Then you move the hoop around the fabric. Your quilt is held in place by the needle. You move the hoop around the next bit you want to sew, lock it all in again, and do the next bit.
That's it. Not rocket science. Why do we put the outer ring in first? Well, you want the fabric you're sewing on to lay flat against the bed of the sewing machine. If you put the inner ring in first, your fabric will be floating above the bed of the machine.
Now one of the comments from one of the judges was that perhaps I should take a bit more time to plan. And I wholeheartedly agree. Had I planned everything out in this quilt, you'd be able to read all the writing clearly, and it would look more cohesive.
It's actually, as it is, a pretty good representation of my thought...er...process (if you can call it that!). As in, there is precious little process to any of my thinking. Like the bits of text that are very difficult to read because there is so little contrast between the color of the thread and the color of the background. I know what it says, and my friend who is the recipient knows what it says...and if you read the book (The White Deer, by James Thurber) you'll know what it says! But if I had planned it out properly, and taken just a wee bit more time, everybody would have been able to read it.
My marks suit the quilt perfectly. I am content.
And I still love my quilt, imperfections and all!
(If you want more pics of this quilt, see this posting!)
It is true - I get impatient when I'm quilting. I change my plans part way through, I can't be bothered to switch thread colors...my name is Debbie and I am an impatient quilter.
I always ask for my quilts to be judged though. There are three judges who view each quilt separately and give marks for certain criteria and written comments.
My marks have stayed pretty consistent for a decade. I'm not going to divulge them, (apparently I have some pride) but suffice it to say that, had I had marks like that in high school, I would have had a lot more friends!
I am most pleased with the written comments though. The judges clearly took their time studying my piece. It can't have been easy for them, because there is such a variation between the great parts of my quilt, and the less-than-great parts.
But one thing all three judges said was how courageous I was to put text in my quilt. (Most of the actual "quilting" - the bit where you sew all three layers together - is done in text.)
And several people who I know from the two guilds I've attended met up with me and asked me how I did so much text.
So I thought I'd describe my "courageous" technique!
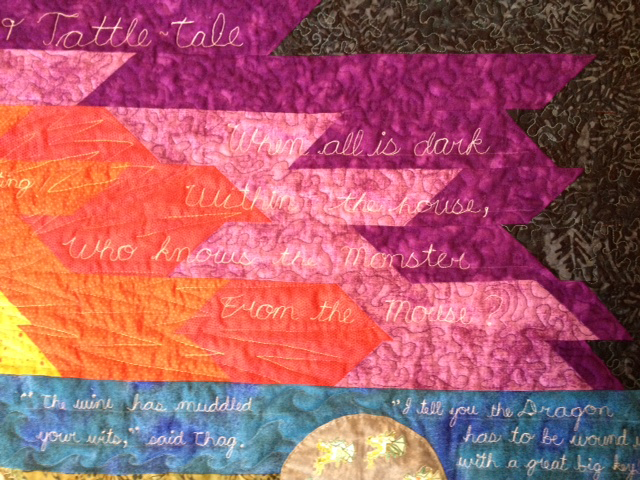
So I will use this quote as my example: "When all is dark within the house, who knows the monster from the mouse?"
I did the text first, before going back over the quilt and filling in the spaces left unquilted.
So first I had to mark the writing on the quilt. The easiest way to practise this (because practise actually helps!) is to use a small quilt sandwich with white fabric. Mark the words with a graphite marker or just a pencil if you're going to be sewing in dark thread. That color combo is the easiest way to mark.
Of course, I didn't have that option. I had to use the blue water-soluble marker for the orange and pink backgrounds of the quote. Where the color switches to dark purple, I had to use a white marker.
Those white markers are tricky to work with though, because you have to go over them multiple times, and it takes up to ten seconds for the white marks to start to show. So you have to be patient when using them.
Once you have your text written out to your satisfaction, you have to use a hoop. You will be using your preferred method of free-motion quilting. Some people drop the feed dogs, I don't. I use the method proposed by Leah Day, where you set your stitch length to zero. She explains it better than I can!
Doing the text as quilting, you really have to put it in a hoop. Some smaller hoops you can put in place simply by lifting your presser foot manually, larger ones are a bit trickier. You have to put the outer ring of the hoop under the presser foot first. I turn it so it's standing up - that way it's not even 1/4" thick - and slide that under the foot. Then you do the same for the inner ring. Finally you shove your quilt in and get it all settled in the hoop, with you writing hopefully contained within it. If the writing extends, well you sew up to where you can't sew any more, and stop with needle down, so you don't have to make a lump backing up over your stitching.
Then you move the hoop around the fabric. Your quilt is held in place by the needle. You move the hoop around the next bit you want to sew, lock it all in again, and do the next bit.
That's it. Not rocket science. Why do we put the outer ring in first? Well, you want the fabric you're sewing on to lay flat against the bed of the sewing machine. If you put the inner ring in first, your fabric will be floating above the bed of the machine.
Now one of the comments from one of the judges was that perhaps I should take a bit more time to plan. And I wholeheartedly agree. Had I planned everything out in this quilt, you'd be able to read all the writing clearly, and it would look more cohesive.
It's actually, as it is, a pretty good representation of my thought...er...process (if you can call it that!). As in, there is precious little process to any of my thinking. Like the bits of text that are very difficult to read because there is so little contrast between the color of the thread and the color of the background. I know what it says, and my friend who is the recipient knows what it says...and if you read the book (The White Deer, by James Thurber) you'll know what it says! But if I had planned it out properly, and taken just a wee bit more time, everybody would have been able to read it.
My marks suit the quilt perfectly. I am content.
And I still love my quilt, imperfections and all!
(If you want more pics of this quilt, see this posting!)
Subscribe to:
Posts (Atom)


